In this section, the color scheme shown in the screenshots may differ from the actual appearance of the Control Centre.
The Alerts & Reports module group consists of the Fraud Alerts, User Activity Alerts, Scheduled Reports and Notification Channels modules.
In this module group, you can configure notifications for fraud attacks and user activities (rule or list changes, blockage cancellations) and enable scheduled reports (hourly, daily, weekly, and monthly). You can also configure notification channels (Email, Telegram, Slack, Mattermost, and HTTP) for all alerts and reports.
¶ Fraud Alerts
In the Fraud Alerts module, you can configure notifications for detected attacks based on protection methods (Proactive Monitoring, Behavioral Analysis, Custom Rules).
You can view this and any corresponding documentation page directly from the Control Centre by clicking the ? ABOUT button in the top-right corner of the page.
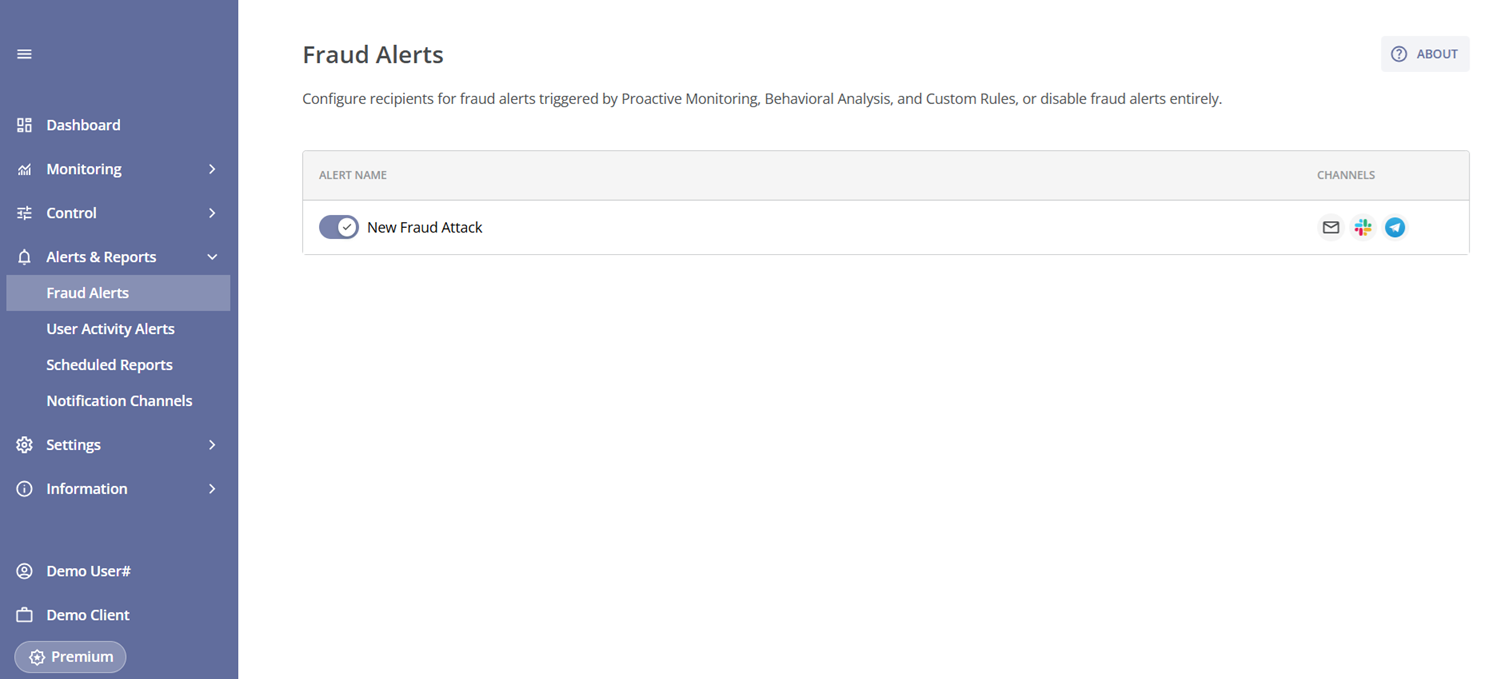
The Fraud Alerts table allows you to enable or disable fraud attack notifications and view the channels that will receive alerts when notifications are enabled.

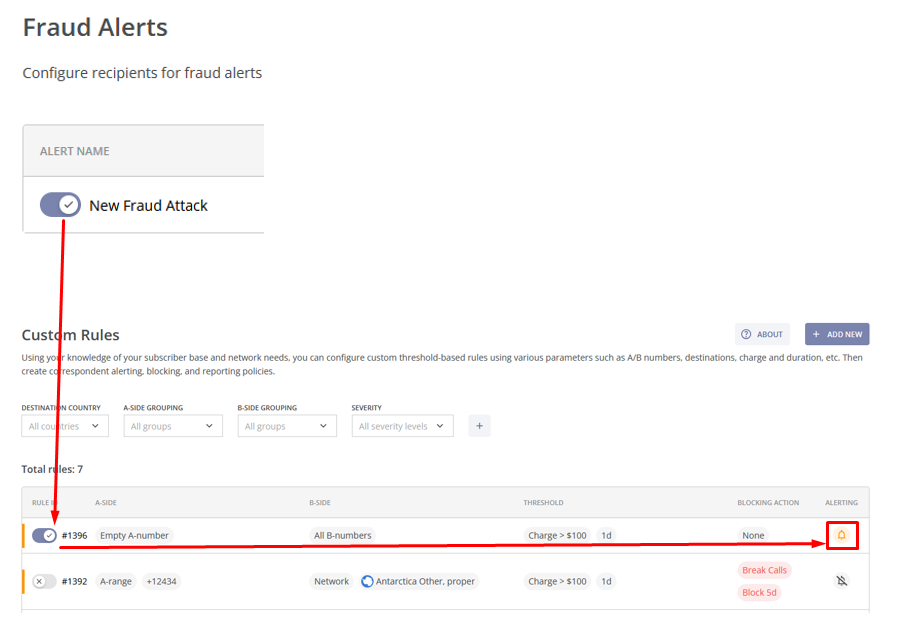
Remember, when the fraud alert toggle switch for “New Fraud Attack” is enabled, alerts are sent only for rules with the "Unmuted" option selected in the Alerting field of Proactive Monitoring, Behavioral Analysis, or Custom Rules (and only if the rule itself is enabled).
You can change the settings, including the list of notification channels, by clicking on the corresponding row in the table. This will take you to the Edit Alert page.
Here you will find the alert name, a toggle switch to enable or disable notifications, and the Notification Channels field.
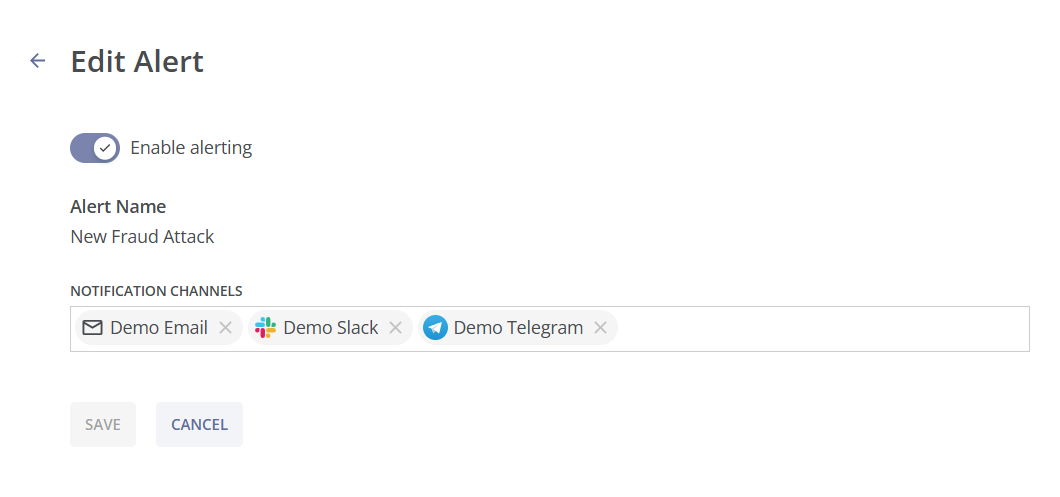
By clicking the Notification Channels field, you can view the list of channels available in the Notification Channels module. From this list, you can add channels or remove them to stop receiving alerts about user actions to the specified channels.
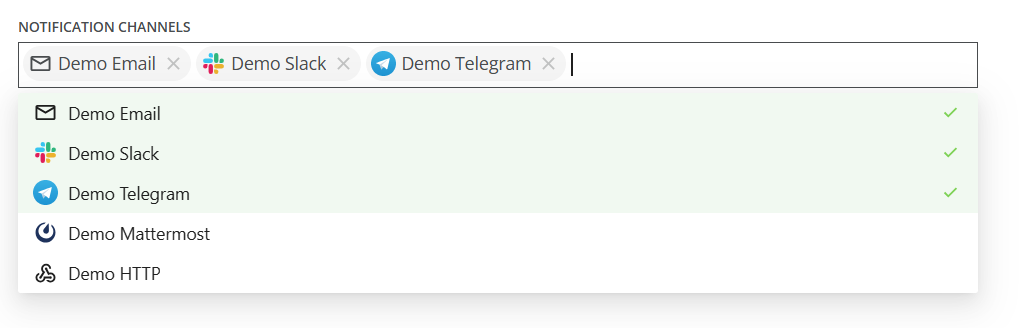
If no channels have been set up before, you will be prompted to go to the Notification Channels module. You should also go to the Notification Channels module if you want to create a new channel in addition to the existing ones. For details on creating channels, see the Notification Channels module.

When the alert is enabled  , users with channels specified in the settings will receive notifications containing details of fraud attacks detected by unmuted protection method rules (Proactive Monitoring, Behavioral Analysis, Custom Rules).
¶ Email Fraud Alerts
Email fraud alerts include the following fields detailing the fraud attack:
- General. This section includes the following information:
- Detected at (UTC): The date and time of the fraud attack detection;
- Method: The protection method used, with a Rule ID provided for custom rules;
- Fraud Type: The type of fraud identified by the system;
- Fraud Probability: The estimated probability that the call attempt is fraudulent, expressed as a percentage.
- Scope. This section includes the following information:
- A-range: The calling (source) side, which can contain a number range, a country, or a network;
- Source: The calling (originating) country and network name;
- B-range: The called (destination) side, which can contain a number range, a country, or a network;
- Destination: The called (terminating) country and network name.
- Description. This section includes the following information:
- Event: The detailed description of the fraud attack event;
- Action taken: The action taken in response to the fraud attack.
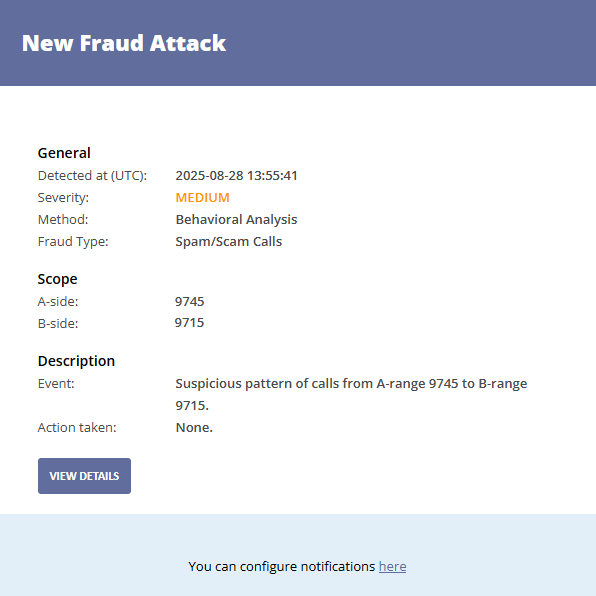
You can click the VIEW DETAILS button to learn more about a particular fraud attack event. You will be taken to the Fraud Attack Details page.

At the bottom of the email, you will find a link that takes you to the Notification Channels page. See the Notification Channels module for more details.

¶ Messenger Fraud Alerts
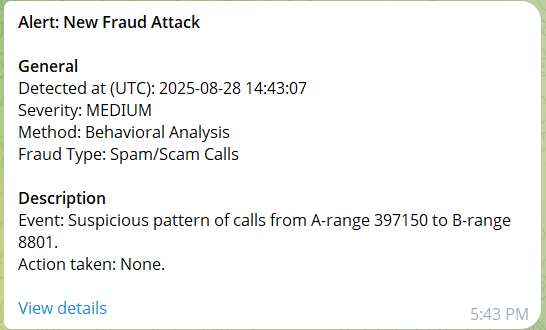
Fraud alerts received via messengers (Slack, Telegram, Mattermost) include the following fields detailing the fraud attack:
- General. This section includes the following information:
- Detected at (UTC): The date and time of the fraud attack detection;
- Severity: The fraud attack severity level;
- Method: The protection method used, with a Rule ID provided for custom rules;
- Fraud Type: The type of fraud identified by the system.
- Description. This section includes the following information:
- Event: The detailed description of the fraud attack event;
- Action taken: The action taken in response to the fraud attack.
You can also click the View details link to go to the Fraud Attack Details page for more information.
An example of the alert in Telegram is provided below. The alert content is the same in Slack and Mattermost.
¶ HTTP Fraud Alerts
HTTP fraud alerts deliver a JSON payload to the target system containing key information about the fraud attack.
{
  "event": "ALERT_NEW_PATTERN",
  "eventTime": "2026-07-02T18:11:32.825Z",
  "data": {
    "id": "2ecf1e06-dc94-4717-97a3-0bd7cb086f79",
    "event_time": "2026-07-02T18:11:32.825Z",
    "client_id": "demo-client-dev",
    "event_type": "BLOCKED_ATTACK",
    "method_type": "CUSTOM",
    "fraud_type": "CUSTOM",
    "severity": "HIGH",
    "importance": "HIGH",
    "fraud_probability": null,
    "rule_id": 18568,
    "scope": {
      "a_range": null,
      "a_destination_id": null,
      "a_country_id": null,
      "a_number_list": null,
      "a_destination_type_id": null,
      "b_range": null,
      "b_destination_id": null,
      "b_country_id": 236,
      "b_number_list": null,
      "b_destination_type_id": null,
      "source_gateway_id": null
    },
    "action": "BREAK_BLOCK",
    "action_duration": 1800,
    "window_size": 1800,
    "threshold_query": "attempts > 2",
    "description": {
      "event": "Traffic within the scope reached the threshold conditions.",
      "action": "Active calls within the scope are broken. This traffic is blocked for 0.5 hour(s).",
      "condition": "Total Call Attempts > 2"
    }
  }
}
¶ User Activity Alerts
In the User Activity Alerts module, you can configure notifications for the following changes:
- Blockage cancellations (Active Blockages module);
- Changes made in protection methods (Proactive Monitoring, Behavioral Analysis and Custom Rules modules);
- Changes made in block or allow lists (Block & Allow Lists module).
You can view this and any corresponding documentation page directly from the Control Centre by clicking the ? ABOUT button in the top-right corner of the page.

In the User Activity Alerts table, you can enable or disable notifications for specific user actions and view the channels configured to receive alerts.

You can change these settings, including the list of channels for each notification type, by clicking the corresponding row in the table. This will take you to the Edit Alert page.
Here you can view the alert name, toggle alerting on or off, and manage the Notification Channels.
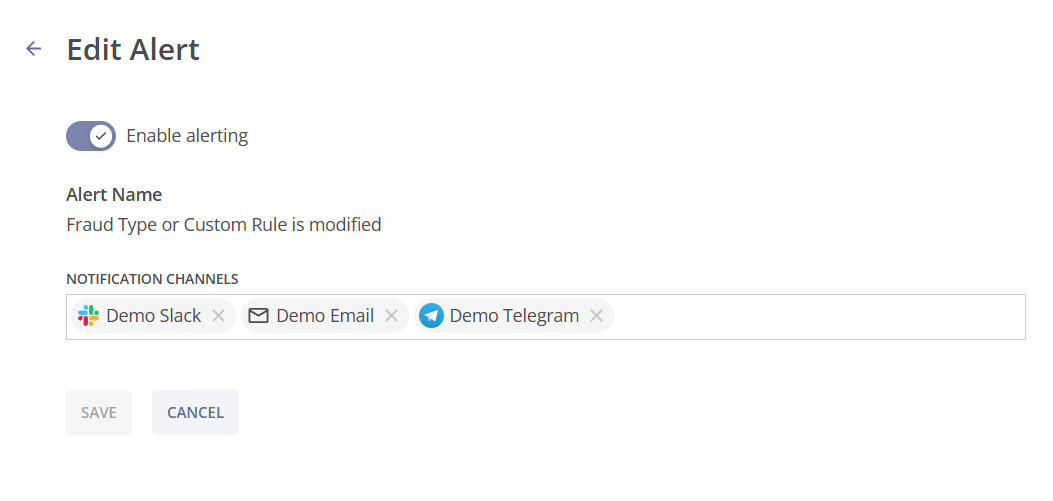
By clicking the Notification Channels field, you can view the list of channels available in the Notification Channels module. From this list, you can add channels or remove them to stop receiving alerts about user actions to the specified channels.
If no channels have been set up before, you will be prompted to go to the Notification Channels module. You should also go to the Notification Channels module if you want to create a new channel in addition to the existing ones. For details on creating channels, see the Notification Channels module.
When alerts are enabled , users with channels specified in the settings will receive notifications according to the selected types of user actions.
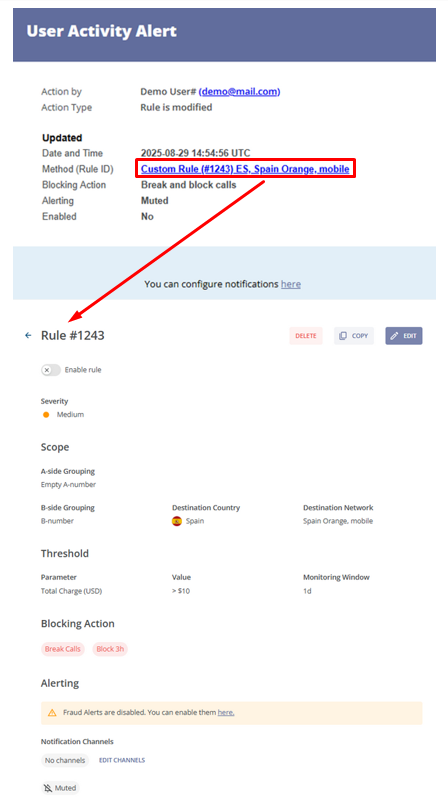
¶ Email User Activity Alerts: Rule is Modified
Email alerts about protection methods changes include the following information:
- The user who performed the action;
- The number of rules modified (if more than one);
- The type of action applied to the rule (created, updated or deleted);
- The time of the action (UTC);
- The protection method and the rule name affected;
- The current settings after the change:
- Alerting (Unmuted/Muted);
- Enabled (Yes/No).
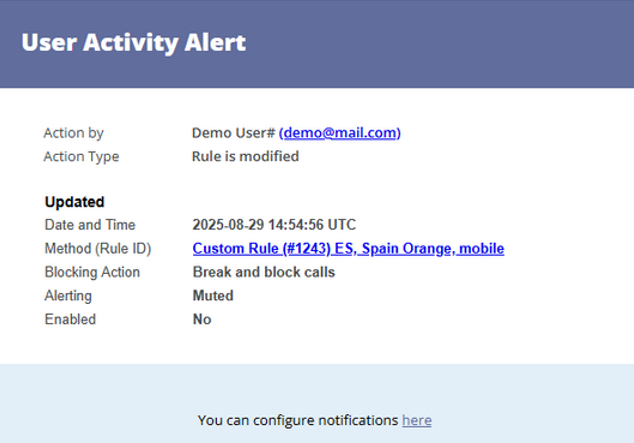
For newly created and updated rules, a link is also provided to view and edit rule details.
¶ Email User Activity Alerts: List is Modified
Email alerts about prefix (block or allow) list changes include the following information:
- The user who performed the action;
- The number of prefix lists modified (if more than one);
- The type of action performed (updated);
- The time of the action (UTC);
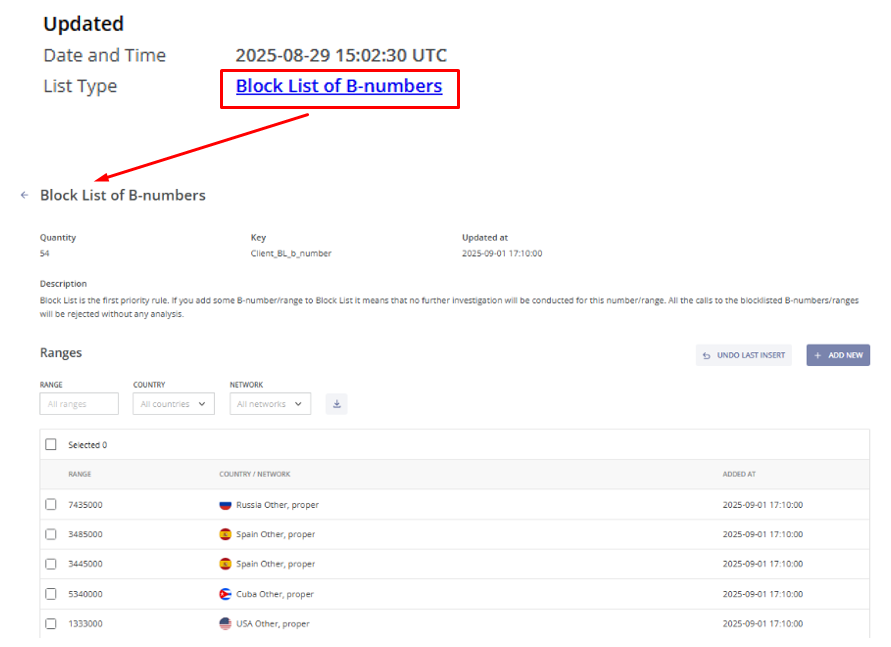
- The name of the updated prefix list (block or allow list of A or B-number ranges).
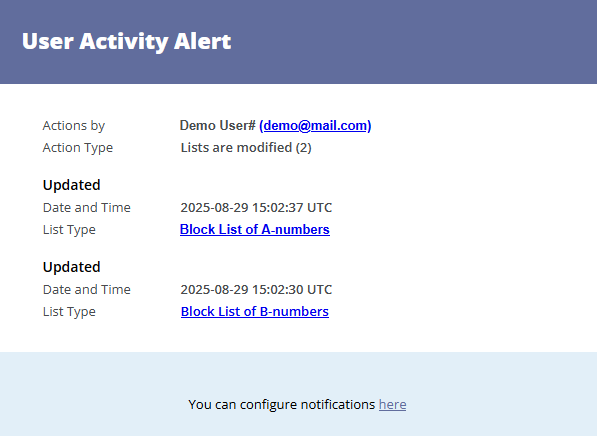
For each updated list, a link is also provided to access detailed information about the list and its number ranges, with the option to edit the number ranges if needed.
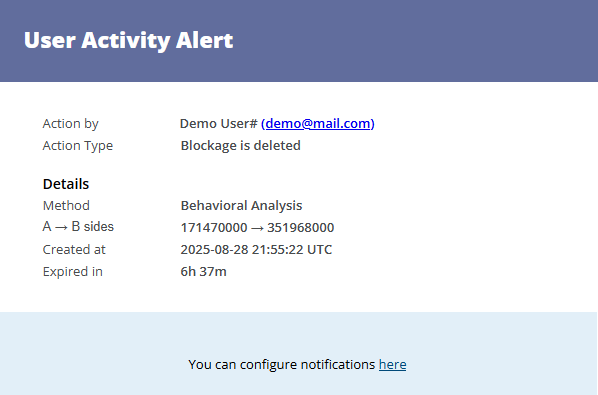
¶ Email User Activity Alerts: Blockage is Deleted
Email alerts about blockage cancellation include the following information:
- The user who performed the action;
- The protection method used, with a Rule ID provided for custom rules;
- The A- and (or) B- sides of the blockage;
- The date and time when the blockage was created (UTC);
- The remaining duration of the blockage at the time it was removed.
All email user activity alerts mentioned above include a link to the Notification Channels page. See the Notification Channels module for more details.
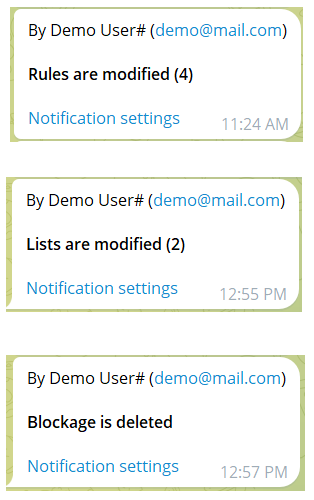
¶ Messenger User Activity Alerts
User activity alerts received via messengers (Slack, Telegram or Mattermost) include brief information about the action applied and the user who performed it.
You can also click the Notification settings link to go to the User Activity Alerts page, where you can configure alert settings.
Examples of alerts in Telegram are provided below. The alert content is the same in Slack and Mattermost.
¶ Activity Log
The Activity Log module provides a chronological audit trail of user and system activities performed within the system. It is designed to help with monitoring changes, investigating incidents, and reviewing user actions.
You can view this and any corresponding documentation page directly from the Control Centre by clicking the ? ABOUT button in the top-right corner of the page.
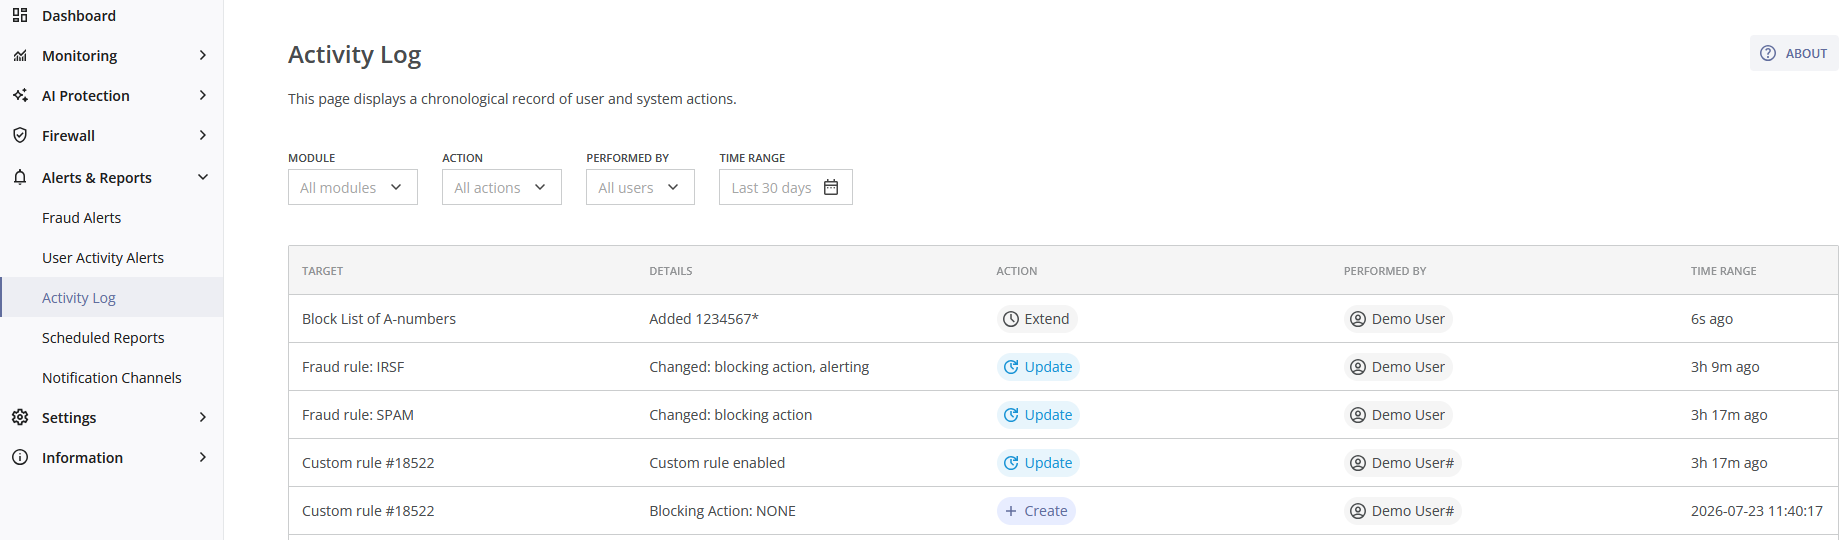
The Activity Log page consists of two sections: the filter panel and the activity table.
The filter panel allows users to narrow the displayed log entries. It consists of the following filters:

- Module: Filters activities by system module (e.g., Custom Rules, Fraud Rules, Block & Allow Lists, Active Blockages, User Management, Authorization);
- Action: Filters records by action type (Create, Update, Extend, Delete, etc);
- Performed By: Displays activities performed by a specific user;
- Time Range: Limits results to a selected date range (you can select one of the suggested intervals from the dropdown list, e.g., Last 24 Hours, Last 7 Days, Last 30 Days, or specify a custom interval).
The activity table displays all recorded activities matching the selected filters. Activities are displayed in reverse chronological order, with the most recent events shown first. The following columns are displayed:

- Target: The object affected by the action (user account, rule, list, etc.);
- Details: A summary of the performed operation or the changes made;
- Action: The type of operation performed (displayed as a colored status badge);
- Performed By: The user that initiated the action;
- Time Range: Indicates when the activity occurred. Recent events are displayed in relative time (e.g., "2h ago"), while older entries display the full timestamp.
You can click the LOAD MORE button at the bottom of the table to display more entries.
The following actions are recorded in the log across the following modules:
- Custom Rules: Rule creation, deletion, enabling/disabling rules, enabling/disabling alerting;
- Fraud Rules: Changes to blocking actions and alerting settings;
- Block & Allow Lists: Adding and removing prefixes from existing lists (displayed with the Extend badge);
- Active Blockages: Removal of active blockages;
- User Management: Creating and removing users, changing user names and roles (including changes made on My Account page);
- Authorization: Successful user logins (displayed with the User Logged In badge and include the authentication method and the source IP address).
Changes to Block & Allow Lists are summarized in the Details column:
- When up to four prefixes are added or removed, the affected prefixes are listed;
- When more than four prefixes are added or removed, the entry displays the total number of affected ranges.

¶ Scheduled Reports
In the Scheduled Reports module, you can configure hourly, daily, weekly and monthly overall reports.
You can view this and any corresponding documentation page directly from the Control Centre by clicking the ? ABOUT button in the top-right corner of the page.
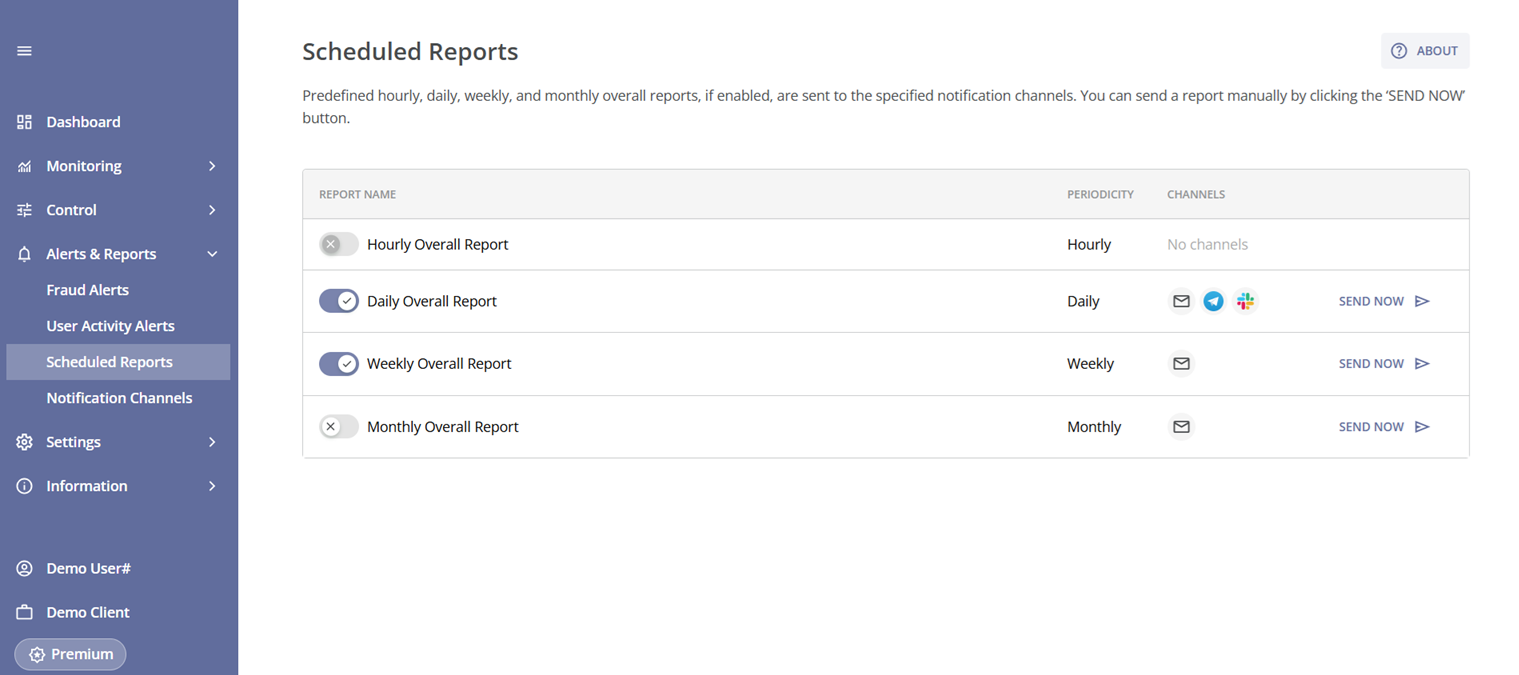
In the Scheduled Reports table, you can enable or disable report delivery and view the channels configured for receiving the reports.
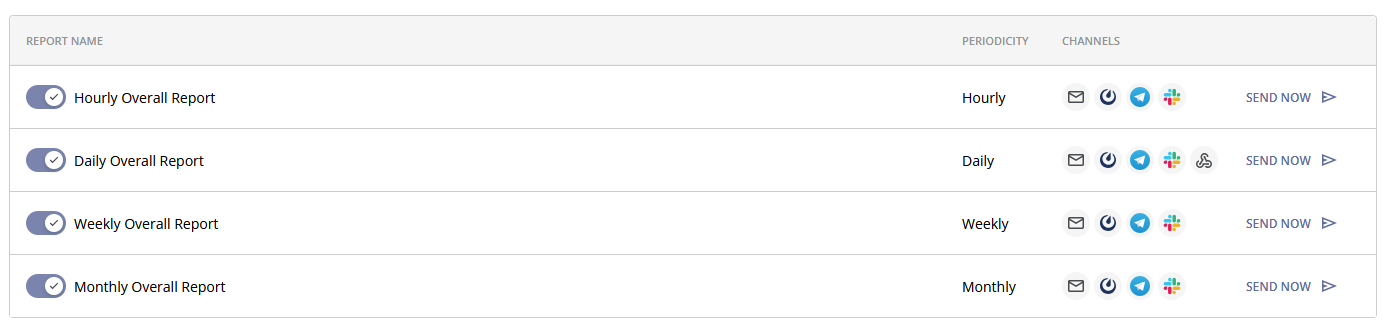
You can also generate a report immediately by clicking the SEND NOW button. This option is available only for reports with configured channels.
You can change these settings, including the list of channels for each report, by clicking the corresponding row in the table. This will take you to the Edit Report page. Here you can find the report name, its frequency (periodicity), a toggle switch to enable or disable report delivery, and the Notification Channels field.
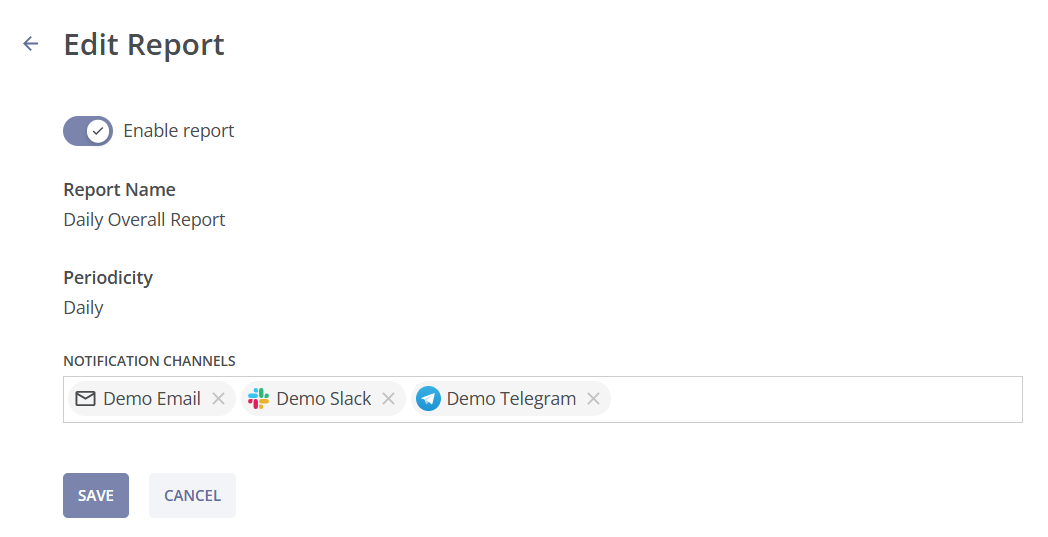
By clicking the Notification Channels field, you can view the list of channels available in the Notification Channels module. From this list, you can add channels or remove them to stop receiving alerts about user actions to the specified channels.
If no channels have been set up before, you will be prompted to go to the Notification Channels module. You should also go to the Notification Channels module if you want to create a new channel in addition to the existing ones. For details on creating channels, see the Notification Channels module.
When reports are enabled , users with channels specified in the settings will receive scheduled reports covering the specified period.
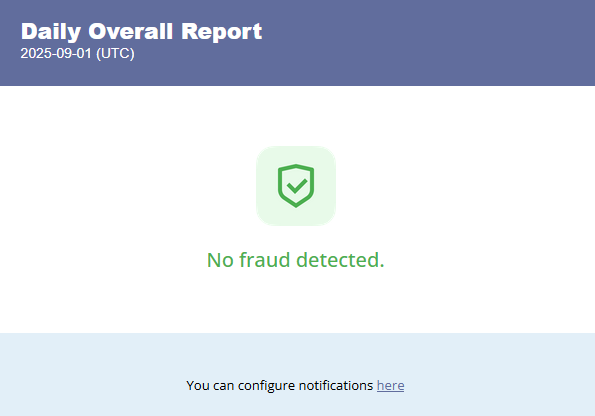
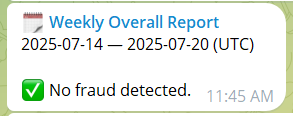
Daily, weekly, and monthly reports are sent even if no fraud was detected during the specified period.
Hourly reports are only sent for the hours when fraudulent activity was detected. However, if you generate an hourly report by clicking the SEND NOW button, it will be sent even if no fraud was detected during that (previous) hour.
¶ Email Scheduled Reports
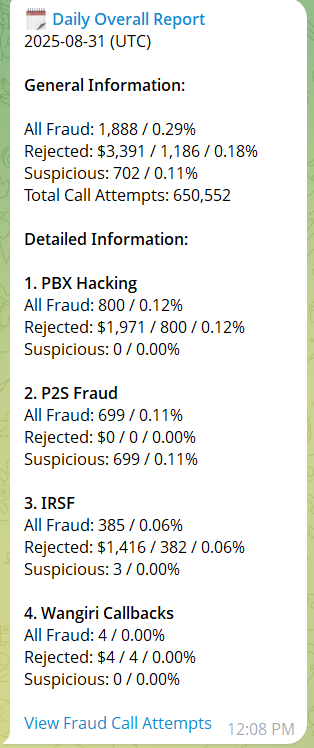
Each email report (hourly, daily, weekly and monthly) includes the following information:
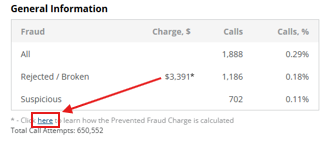
- General summary of fraudulent call attempts amount, fraudulent call attempts percentage (relative to the value of all call attempts) for the specified period, broken down by categories: All, Rejected/Broken, and Suspicious. The summary also includes the prevented fraud charge value;
- Total number of all call attempts (fraudulend and non-fraudulent) for the specified period;
- Detailed summary of fraudulent call attempts amount, fraudulent call attempts percentage (relative to the value of all call attempts) for the specified period, grouped by fraud type, with the same category breakdown (All, Rejected/Broken, and Suspicious). The summary also includes the prevented fraud charge value.
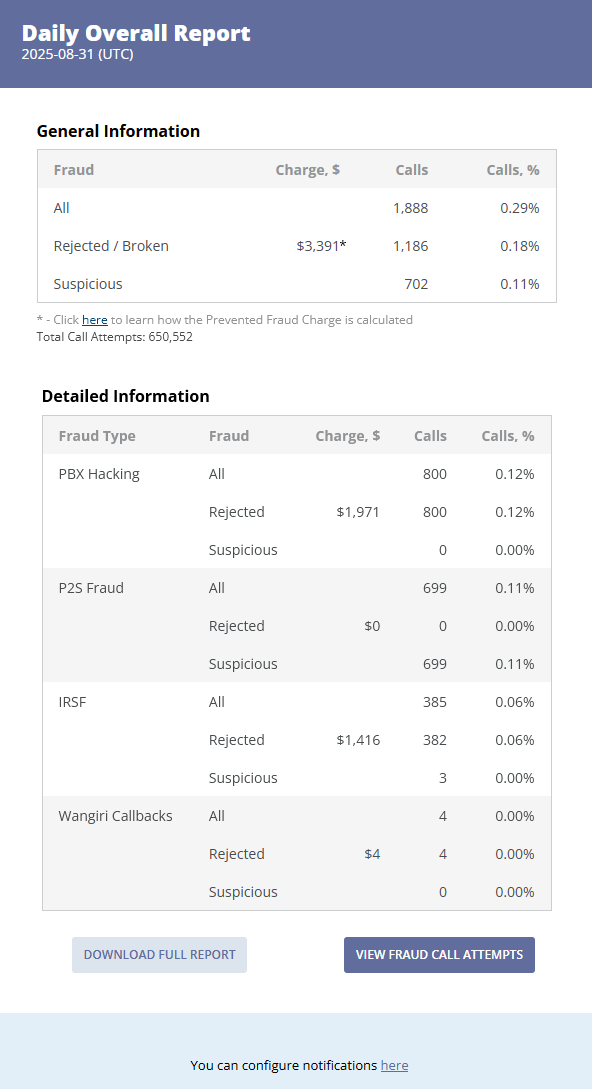
In the General Information section, you can find a link that leads to the Calculations module, where you can learn more about how the Prevented Fraud Charge is calculated.
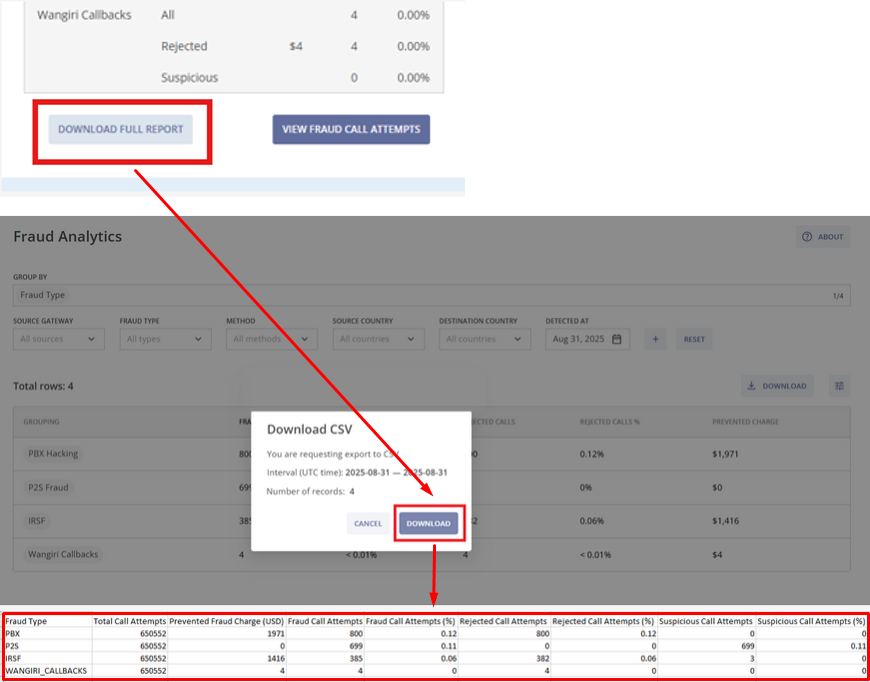
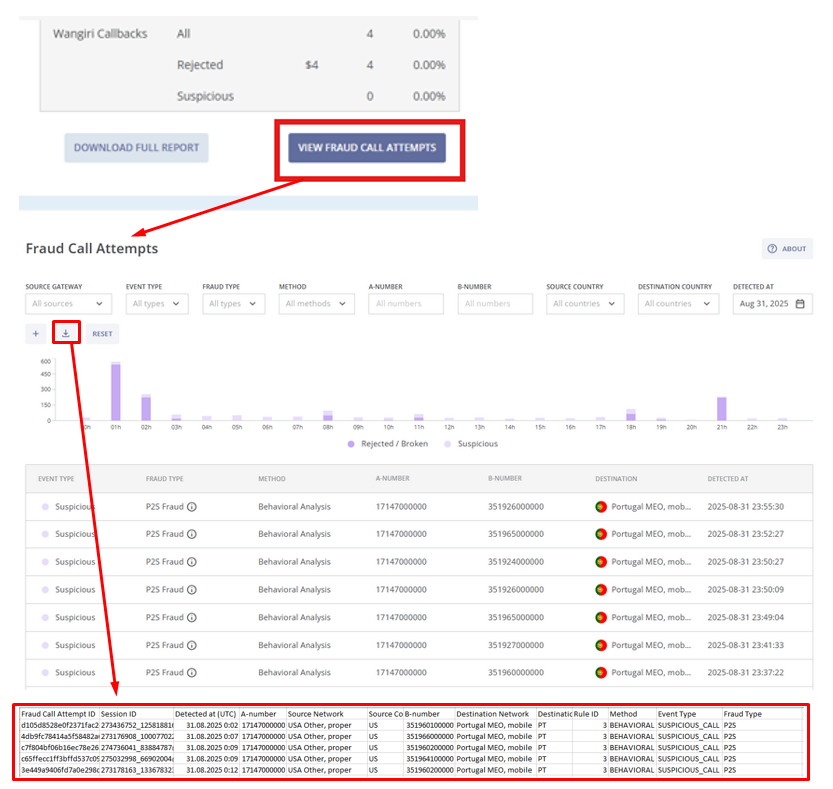
By clicking the DOWNLOAD FULL REPORT button you will be taken to the pop-up window of Fraud Analytics module, where you can get the full report (by clicking the DOWNLOAD button) for the specified period.
You can also change the data groupings before downloading the full report. In order to do this, click on the CANCEL button. Then click the GROUP BY field in the Fraud Analytics page and select Source Country, Destination Country, or Source Gateway to group the data table accordingly. After that click on the DOWNLOAD button.
See the Fraud Analytics module for more details.
By clicking the VIEW FRAUD CALL ATTEMPTS button you will be taken to the Fraud Call Attempts page, where you can find a chart showing statistics for the time period specified in the email report and a table with detailed information about each fraud call attempt. You can download the file with fraud call attempts by clicking the DOWNLOAD button  .
.
See the Fraud Call Attempts module for more details.
At the bottom of the email, you will find a link that takes you to the Notification Channels page.
See the Notification Channels module for more details.
Daily, weekly, and monthly reports are delivered even if no fraud was detected during the specified period.
Hourly reports are delivered for the hours when fraudulent activity was detected.
¶ Messenger Scheduled Reports
Scheduled reports received via messengers (Slack, Telegram, Mattermost) include the following information:
- General summary of fraudulent call attempts amount, fraudulent call attempts percentage (relative to the value of all call attempts) for the specified period, broken down by categories: All, Rejected/Broken, and Suspicious. The summary also includes the prevented fraud charge value;
- Total number of all call attempts (fraudulend and non-fraudulent) for the specified period;
- Detailed summary of fraudulent call attempts amount, fraudulent call attempts percentage (relative to the value of all call attempts) for the specified period, grouped by fraud type, with the same category breakdown (All, Rejected/Broken, and Suspicious). The summary also includes the prevented fraud charge value.
Clicking the report title takes you to the Fraud Analytics module, where you can view fraud call statistics for the specified period.
You can also click the View Fraud Call Attempts link to access the Fraud Call Attempts module, which contains detailed information about corresponding fraud call attempts.
Examples of the reports in Telegram are provided below. The reports content is the same in Slack and Mattermost.
¶ HTTP Scheduled Reports
HTTP scheduled reports deliver a JSON payload to the target system containing data about fraud calls for the specified period, grouped by fraud type.
{
  "event": "REPORT",
  "schedule": "DAILY",
  "interval": "2025-08-31",
  "timeFrom": 1756598400000,
  "timeTo": 1756684799999,
  "data": [
    {
      "groupingKeyValue": "PBX",
      "fraudCalls": 800,
      "rejectedFraudCalls": 800,
      "callAttempts": 650552,
      "preventedFraudCharge": 1971
    },
    {
      "groupingKeyValue": "P2S",
      "fraudCalls": 699,
      "rejectedFraudCalls": 0,
      "callAttempts": 650552,
      "preventedFraudCharge": 0
    },
    {
      "groupingKeyValue": "IRSF",
      "fraudCalls": 385,
      "rejectedFraudCalls": 382,
      "callAttempts": 650552,
      "preventedFraudCharge": 1416
    },
    {
      "groupingKeyValue": "WANGIRI_CALLBACKS",
      "fraudCalls": 4,
      "rejectedFraudCalls": 4,
      "callAttempts": 650552,
      "preventedFraudCharge": 4
    }
  ]
}
¶ Notification Channels
The Notification Channels module is used to configure channels and channel groups for receiving alerts and reports.
You can view this and any corresponding documentation page directly from the Control Centre by clicking the ? ABOUT button in the top-right corner of the page.
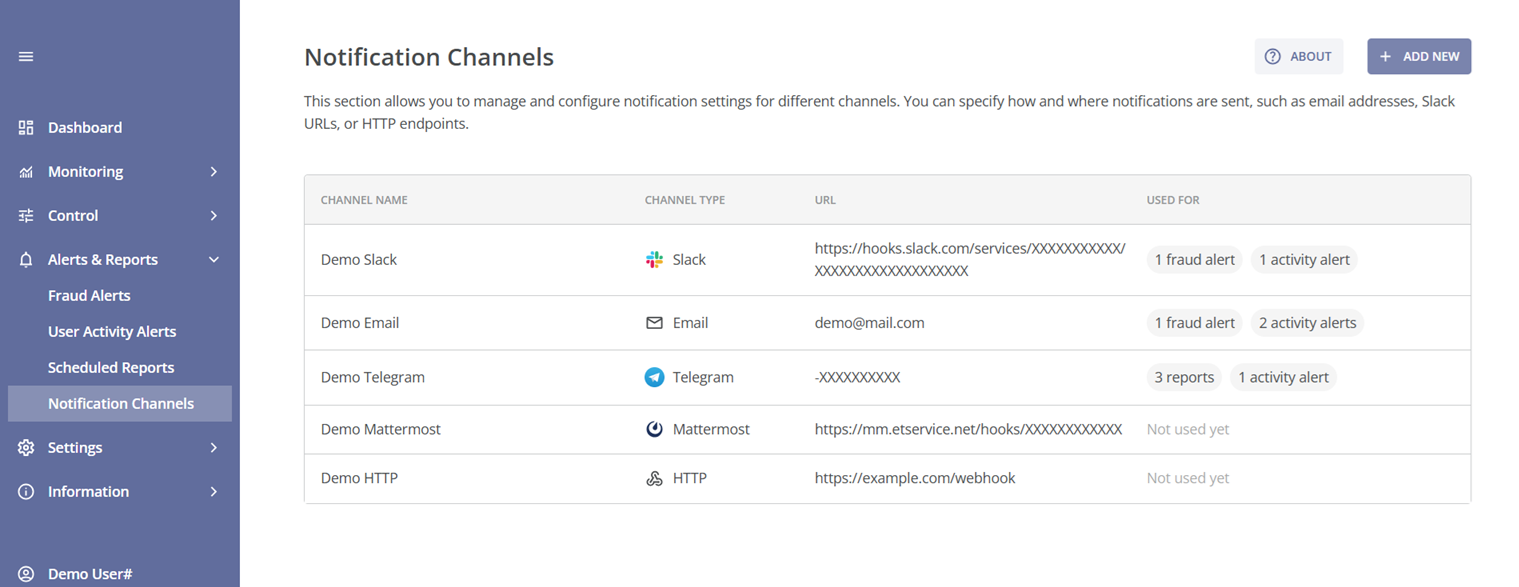
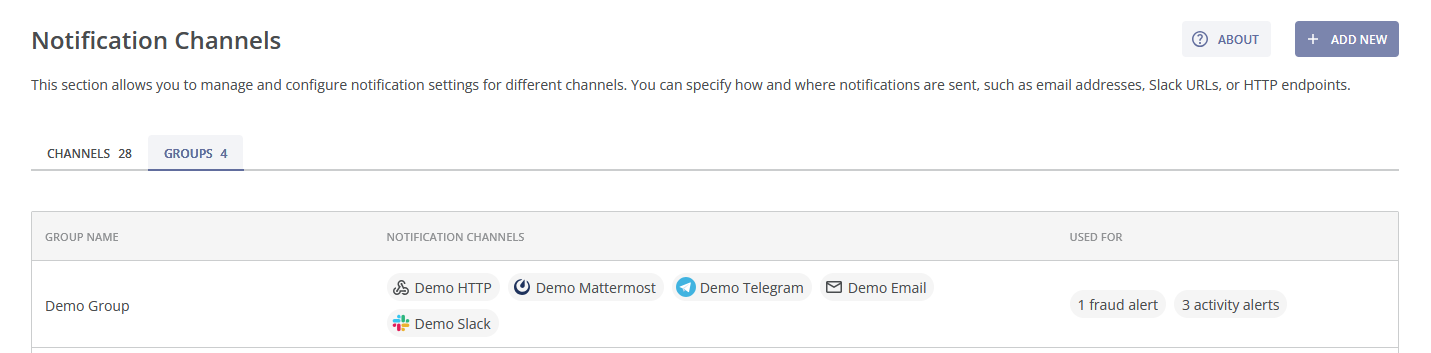
The main section of the page includes two tables: CHANNELS and GROUPS.
¶ Channels
The CHANNELS table contains the following information for each channel:
- Channel Name: The display name or identifier for the channel;
- Channel Type: The type of channel used to send notifications (e.g., Email, Slack, Telegram, etc.);
- URL: The destination address for the selected channel type. It can be a URL, сhat ID, or email address, depending on the channel;
- Used for: Indicates where the channel is currently used, such as in reports or alerts, or shows "Not used yet" if it’s not in use.
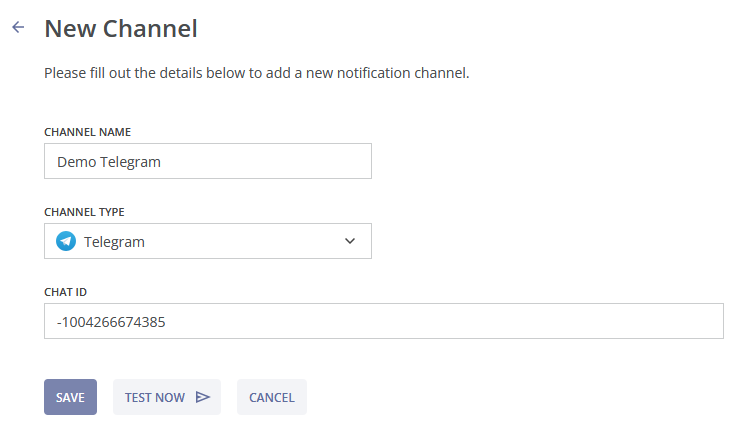
To add a new channel, click the + ADD NEW button located in the top-right corner of the page and select New Channel. You will be directed to the New Channel page.
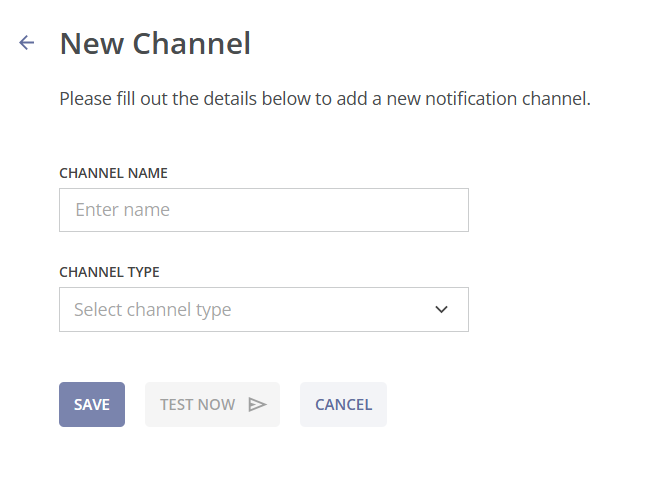
Next, enter channel details:
- Channel Name: Enter the channel's display name;
- Channel Type: Select the appropriate type from the dropdown list.
After you select a channel type, an additional input field for the destination address will appear. This field's format adjusts dynamically based on your selection.
Below is a description of the required input for each channel type:
- Email: When Email is selected as the Channel Type, the EMAIL ADDRESSES field appears.
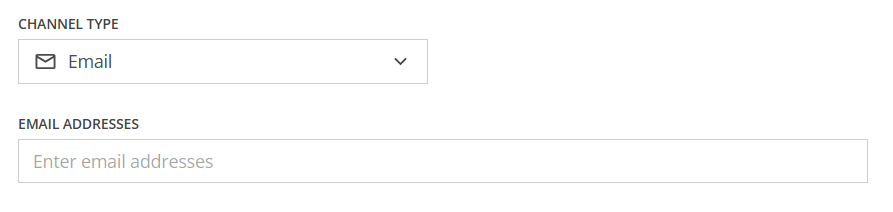
You can enter only one email address in one channel. If you want to add two or more email addresses you can use a channel group. - Slack: When Slack is selected as the Channel Type, the SLACK URL field appears.
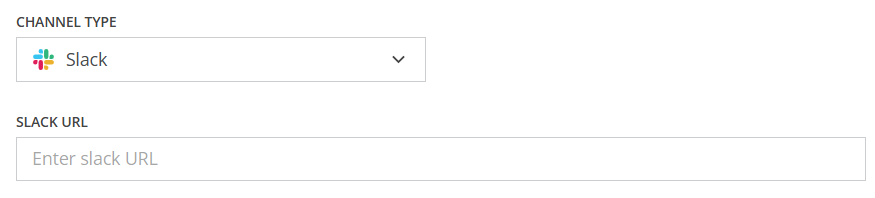
Use the following link to configure the channel: https://api.slack.com/messaging/webhooks#create_a_webhook - HTTP: When HTTP is selected, the WEBHOOK URL field appears.
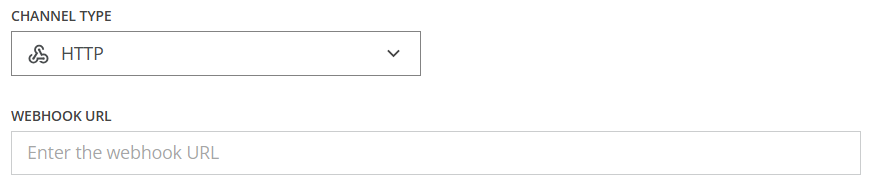
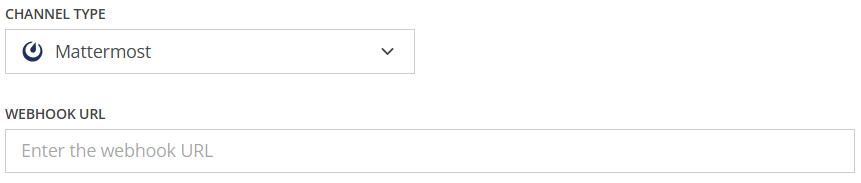
Provide the endpoint URL to which notifications will be sent via HTTP POST. - Mattermost: When Mattermost is selected as the Channel Type, the WEBHOOK URL field appears.
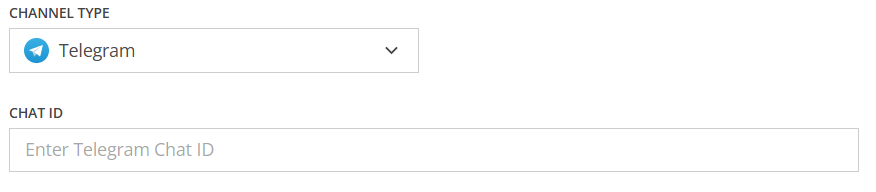
Use the following link to configure the channel: https://developers.mattermost.com/integrate/webhooks/incoming/ - Telegram: When Telegram is selected as the Channel Type, the CHAT ID field appears.
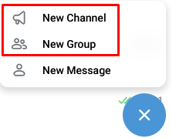
Make sure to add the bot to the chat, then find the correct Chat ID by following the steps below.- Open your Telegram account in web (https://web.telegram.org).
- Click on the
 button at the bottom of the page.
 - Create a new group or channel (or use an existing one).
- Add @fms_alerts_reports_bot to the new or existing group/channel.
- Copy the chat ID (of this group/channel) from the URL in your browser’s address bar. It should look like this: https://web.telegram.org/a/#-1004266674385. The chat ID is the sequence of numbers that follows the # symbol. For example: -1004266674385.
Some Chat IDs, especially for channels and certain types of groups, may start with -100. This prefix might not always be visible in the URL, but if it is part of your Chat ID, you must include it.
Once you have filled in all required fields (channel name, type, and address), you can click TEST NOW to verify that the entered destination address is working correctly.
If the channel is configured correctly, you will receive a test message.
To save the newly created channel, click SAVE.
You can also manage an existing channel by clicking the channel’s row. You will be taken to the Edit Channel page.
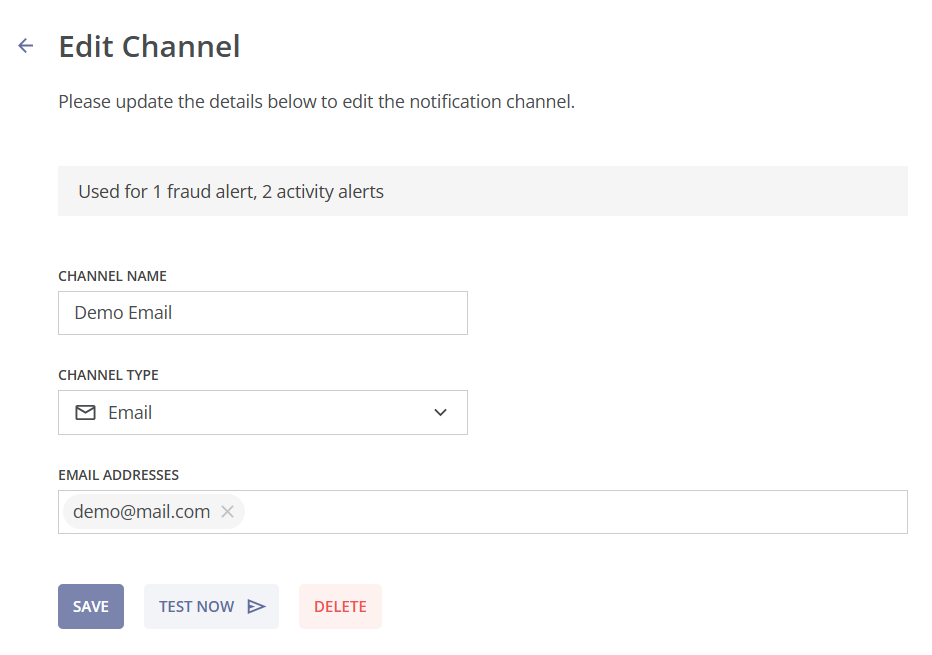
In the Edit Channel form you can change the channel name, the channel type, and the destination address. If you change the channel type, you will need to update the destination address accordingly.
Here you can also see where the channel is currently used.
Click the SAVE button to confirm the changes.
To delete a channel, click the DELETE button on the Edit Channel page. A pop-up notification will appear, asking you to confirm your decision. Click CANCEL to stop or DELETE to proceed with the deletion. This action cannot be undone.
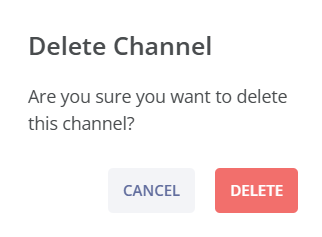
A channel cannot be deleted if it is used in any active alert or report. Before deletion, it must be removed from all dependent alerts and reports.
¶ Groups
You can use groups to configure alerting for multiple channels at once, including several email channels (addresses), instead of managing them one by one.
The GROUPS table contains the following information for each group:
- Group Name: The display name or identifier for the group;
- Notification Channels: The list of channels included in the group;
- Used for: Indicates where the group is currently used, such as in reports or alerts, or shows "Not used yet" if it’s not in use.
To add a new group, click the + ADD NEW button located in the top-right corner of the page and select New Group. You will be directed to the New Group page.

Next, enter the group details:
- Group Name: Enter the group's display name;
- Notification Channels: Select the appropriate channels from the dropdown list.
To save the newly created group, click SAVE, alternatively click CANCEL to discard the changes.
You can manage an existing group by clicking the group’s row in the table. You will be taken to the Edit Group page.
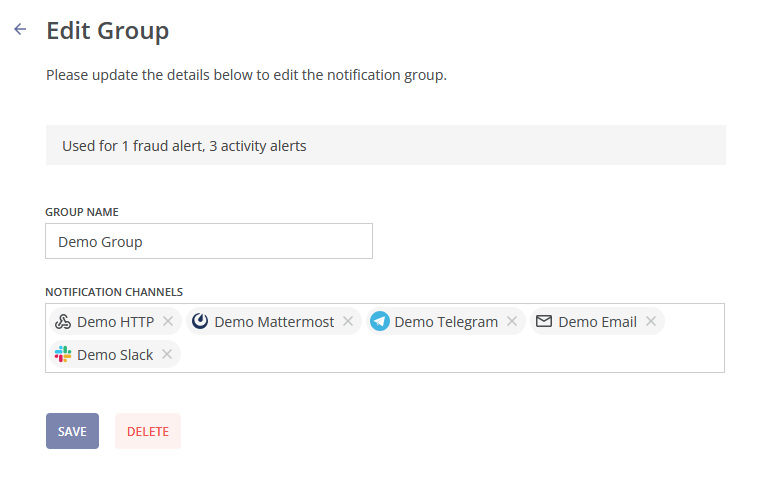
On the Edit Group page, you can change the group's name and the notification channels included in the group.
Here you can also see which alerting is currently set up for this group.
Click the SAVE button to confirm the changes.
To delete a group, click the DELETE button on the Edit Channel page. A pop-up notification will appear, asking you to confirm your decision. Click CANCEL to stop or DELETE to proceed with the deletion. This action cannot be undone.
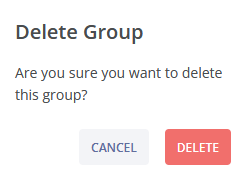
A group cannot be deleted if it is used in any active alert or report. Before deletion, it must be removed from all dependent alerts and reports.